
So you’ve canned some beautiful jars of food. Now what? Sure, you wipe the counters, wash the pots and pans. . . but what do you do with the food? In the last several years I’ve come up with a system that works for me–I’m sharing in hopes that it will help some of you out!

After your jars are done processing (via boiling water bath or pressure canning) you place them on a towel or a rack in a draft free area to cool for 12 to 24 hours. Why the cloth or rack? Well your jars are SMOKIN hot, especially from the pressure canner (it’s not unusual for some jars to continue boiling inside for half an hour or so). If you place a hot glass jar on a cold counter, well, there is a chance it could break. How often has this happened? Well I have no idea, but it’s the recommendation and it’s easy enough to do, so why not?

Once the jars are cool (usually the next morning for me) I remove the rings and check the seals on my jars. Anything that didn’t seal is immediately paced in the fridge to be consumed soon.

Next I wash all my jars of food. Yes. Really. The first year I canned I did not do this–and regretted it. You see sometimes stuff gets into the water inside your canner. You might have dribbled some food on the outside of your jars while filling, or there might have been some siphoning of the liquid from inside your jars into the water of the canner during processing. If this happens whatever that is (sugar syrup, chicken juice, pickling brine) it mixes into the water and is spread all over the outside of your jars. You might not see anything (I didn’t) but when I went down to grab the jars several moths later. . . there was mold growing on the outside of the jar.
Blech. The food inside was fine, but I had to scrub the jar before opening it. It was just nasty. It only takes a few minutes for me to wash the jars and make sure that they are totally clean, so I do.
 When my jars are dry I use a permanent marker to write what it is and the date (month and year) on the lid. Trust me, if you make several kinds of dark jelly you might have a hard time telling which is blueberry, which is grape and which is seedless blackberry. Or which tomato sauce recipe you used. Labeling is a good thing. . . but it doesn’t need to be fancy.
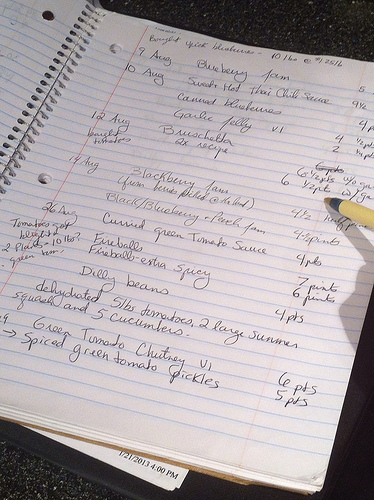
This next step took me a couple of years to figure out. Just before I get ready to put my jars away, I record the results of my canning session in my “preserving notebook”. It’s just a notebook. I record the date, what recipe/item I made, and then how many jars and of what size. In the side margin I note how much produce I started with, where it was obtained (ie garden, farmers market etc) and how much I paid for it. In the back of the notebook I rewrite all the recipes I use. If I do different versions (say there are 3 kinds of spaghetti sauce, one without garlic, one with, one low salt) I name them V1, V2 etc and use that as the label both on the jar and in the book.
Why do I do that? Well, several reasons. First, from one year to the next I couldn’t remember how many quarts of peaches I was able to can from a bushel–that made my purchases hard to plan the next year. Listing the prices paid help me to see how much each jar of food is worth–and to track the prices from year to year. As for the recipes and versions–it is incredibly annoying to open a jar of salsa that is just PERFECT–and then not be able to remember exactly WHICH of the 37 salsa canning recipes you have that created that jar.
 And when all that is done, you take your jars (rings still removed!) and put them into storage in a clean, cool, dark, dry place. The National Center for Home Food Preservation recommends a storage temperature of between 50-70. You want a dark storage area because with the clear glass jars light will reach your food and can leach out nutrients and fade your food (this does not affect food safety but seriously effects quality). Storing in a damp area could allow the metal lids to corrode, breaking the seal.
Finally, you need to be aware of how to identify and deal with spoiled food–I want you all to have the best information possible, so I’m just going to refer you to the National Center for Home Food Preservation’s page on storing home canned food that has a section on “Identifying and Handling Spoiled Canned Food”
Here are some other “how to” canning posts you might enjoy:
Getting Prepared for a Canning Session
Hot Water Bath Canning Tutorial
note: If you are wondering what exactly is inside of those pretty jars–it’s the Bruschetta in a Jar recipe.


This is great advice! Thank you for posting this. I just canned 21 pints of salsa this afternoon and hope to do a large batch of vegetable soup later this week. I will wash my jars after they have cooled. I’ve never done that but it sure makes sense! 😉
Glad this helped! I’m not one to do extra work–trust me. But the mold on the outside thing really grossed me out.
Washing the outside of the jars makes so much sense! I’ve never thought about it before but I’ll start doing it. Thanks! 🙂
It makes me so happy when a tip I share is useful to someone 🙂
Love the notebook! I just started record keeping on my laptop this year. I’ve been canning all my life, and only now am I ready to take on this added responsibility. LOL!
Re storage: I wrap my jar boxes in Saran wrap. I get the restaurant size box of plastic wrap from Costco, and it just takes a minute to wind it around the boxes. It keeps the jars squeaky clean, ensures a dry environment for them, and keeps my storage boxes in good shape for reusing from year to year. Over the winter, as I empty jars, I wash, dry, and wrap them, too. When it’s time to can again, opening up the box of clean jars, ready to sterilize, is super sweet.
Ohhh, that’s a very interesting idea Carla! I’ll have to try it.
One more thing, about washing canned jars: I have always been careful to use cool water for that. I’m not sure how important that is, but I think warm or hot water could raise the temperature of the food and put the seal at risk. So I just use cool, or tepid, water with dish soap.
I just finished 70 jars of wild Muscadine jelly, and working through my apple pectin, now. Canning makes me totally happy. 😉
Happy to have stumbled upon your blog. I spent many years in upstate New York, and now practice frugal living over in Massachusetts.
Carla–I’ve always used warm water and haven’t had issues, but I’m sure it’s fine to err on the side of caution!
I’ve been canning for several years and want to thank you for this great advice! Washing jars – what a novel idea. I’ve never had mold, but sometimes jars can get sticky. And your notebook idea. Seriosuly don’t know why I didn’t think of it. THANKS!
Glad to help Diana! Yes, I have never read in any of my canning books about washing the jars after they have sealed and cooled, but it just makes so much sense to me, and only takes a little extra time. And the notebook really truly keeps me on track. I’m hoping to develop a prettier “printable” format that I can offer to everyone to use that will be nicer looking than the notebook.
Great info. I’m going to start a book like yours!